Ingestion into Sentinel via Event Hub made simple
Hey there 🖖 - In this blog post, I want to introduce you to a preview feature that simplifies the ingestion of massive data into Sentinel by using Event Hub.
Spoiler alert: In my opinion this is truly a game changer for anyone working with large data volumes streamed to Event Hub and looking to leverage that data in Sentinel! 🚀🥳
What you can expect from this blog post:
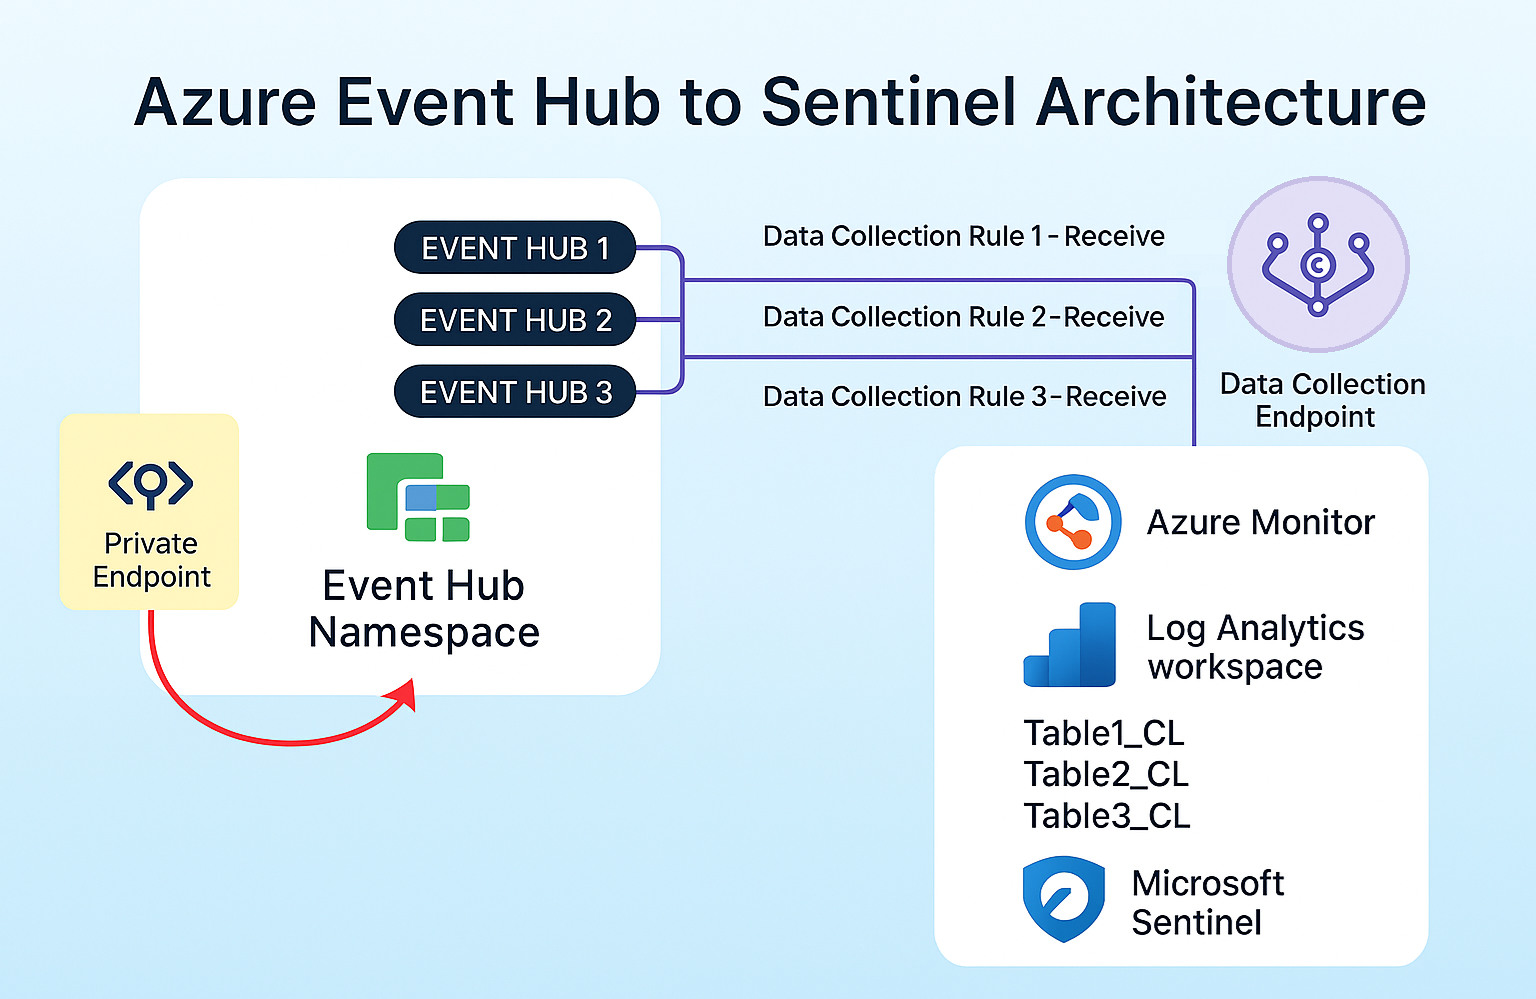
We will explore a new Azure Monitor feature (currently in preview) that allows you to retrieve data from an Event Hub and send it to a Log Analytics workspace using a Data Collection Endpoint (DCE) and Data Collection Rule (DCR).
This feature leverages the power of Event Hub to collect and process large volumes of data from various sources using the native Azure Monitor toolkit, eliminating the need for custom code or complex configurations.
I will guide you through the nessessary steps to set up and to deploy this at scale when dealing with multi data sources. The script is designed to be reusable and scalable, allowing you to easily add new data sources as needed.
The full script can be found in my GitHub repo
At the end we will have an architecture like this - quite simple, huh? 😊
Before we get started, let’s also quickly recap the key components involved in this process:
- Event Hub https://learn.microsoft.com/en-us/azure/event-hubs/event-hubs-about
- Event Hub Tutorial: https://learn.microsoft.com/en-us/azure/event-hubs/event-hubs-create
- DCR https://learn.microsoft.com/en-us/azure/azure-monitor/data-collection/data-collection-rule-overview
- DCE https://learn.microsoft.com/en-us/azure/azure-monitor/data-collection/data-collection-endpoint-overview
✅Pre-requisites
- Event Hub namespace (if public access disabled, make sure “Allow trusted Microsoft services to bypass this firewall” is enabled)
- Sentinel workspace (requires dedicated cluster, or commitment tier)
- Your actual data sources that will send data to the Event Hub
NOTE: To use this Event Hub streaming feature, your workspace must be either in a dedicated cluster or having a commitment tier. For more information see https://learn.microsoft.com/en-us/azure/azure-monitor/logs/ingest-logs-event-hub
The below steps will guide you through the process of setting up the necessary Azure Monitor resources to ingest data from Event Hub into Sentinel:
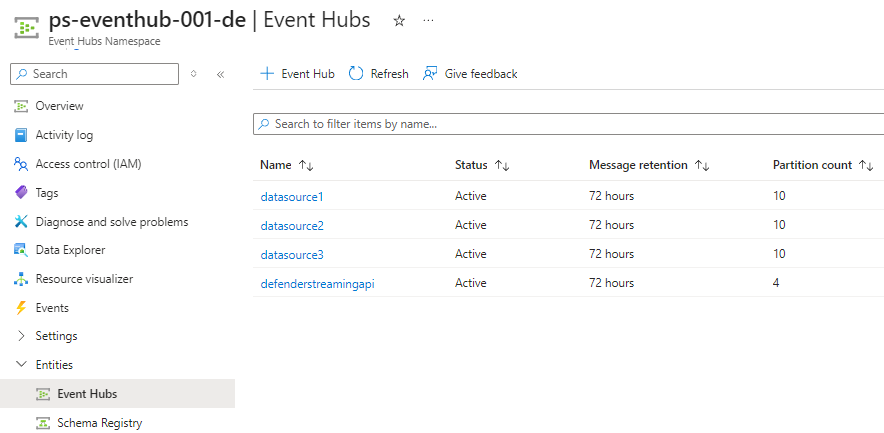
- Create event hubs within existing namespace
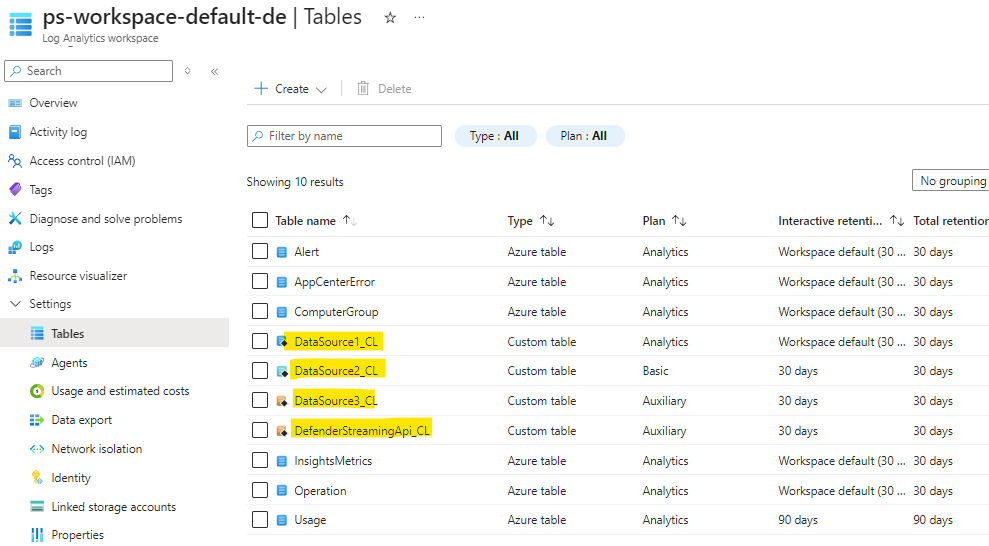
- Create custom tables of type Auxiliary, Basic or Analytics within your Sentinel workspace
- Create DCE for your workspace (if not already done)
- Create DCR associated to DCE to send data into above custom table (this is where the magic happens to consume data from EVH)
- Associate the DCR with the event hub (DCRA)
- Assign event hub receiver permission to DCR managed identity (role assignment)
NOTE: This feature is not exclusive to the Auxiliary tier, thus you can also choose Basic or Analytics table tier based on your specific requirements and needs.
⚙️Prep - define your variables
The first step is to define your variables. Make sure you have the Azure ResourceIds for the below handy:
- Workspace
- Data Collection Endpoint (DCE)
- Event Hub namespace
The script will automatically deploy the Azure Monitor resources into the same Resource Group as the workspace, but you can choose a different one if you prefer. Just make sure the DCRA (basically linking DCR with the Event Hub) is in the same region as the Event Hub namespace. More on that later.
1
2
3
4
5
6
7
8
9
10
11
12
# variables
$location = "germanywestcentral"

$workspaceId = "/subscriptions/xxxxxxx/resourcegroups/xxxxxxx/providers/microsoft.operationalinsights/workspaces/xxxxxxx"
$dce_id = "/subscriptions/xxxxxxx/resourceGroups/xxxxxxx/providers/Microsoft.Insights/dataCollectionEndpoints/xxxxxxx"

$eventHubNamespaceId = "/subscriptions/xxxxxxx/resourceGroups/xxxxxxx/providers/Microsoft.EventHub/namespaces/xxxxxxx"
$eventHubNamespaceName = $eventHubNamespaceId.Split("/")[-1]

$workspaceName = $workspaceId.Split("/")[-1]
$resourceGroup = $workspaceId.Split("/")[-5]
$resourceGroupId = ($workspaceId.Split("/providers",2))[0]
📄Prep - define your data sources in data map
The following configuration needs to be tailored to the specific data sources you plan to onboard to the Event Hub namespace and which will eventually be ingested into the Sentinel workspace. Defining the partitions and totalRetentionInDays parameters is essential, as they are used to provision the actual Event Hubs and, if not already present, the corresponding custom tables in your workspace. Additionally, be sure to specify the table log tier - in our example we are going for all available types, including Auxiliary.
1
2
3
4
5
6
7
# map of data sources to create event hubs and corresponding tables in workspace
$dataMap = @(
    @{source="DataSource1"; partitions=10; totalRetentionInDays=120; plan="Analytics"},
    @{source="DataSource2"; partitions=10; totalRetentionInDays=90; plan="Basic"},
    @{source="DataSource3"; partitions=10; totalRetentionInDays=30; plan="Auxiliary"},
    @{source="DefenderStreamingApi"; partitions=4; totalRetentionInDays=30; plan="Auxiliary"}
)
🛠️1 Create event hubs in your existing namespace
To deploy this, we will iterate through the data map. Ensure you have the appropriate Azure PowerShell module installed -> Install-Module az.eventhub
1
2
3
foreach ($item in $dataMap) {
    New-AzEventHub -ResourceGroupName $resourceGroup -NamespaceName $eventHubNamespaceName -Name $item.source -RetentionTimeInHour 72 -PartitionCount $item.partitions -CleanupPolicy Delete
}
🛠️2 Create custom table of type aux in desired workspace
To create a custom auxiliary table check the below template. Depending your data source and your planned transformations you may want to adjust the table schema and columns accordingly. The RawData column is a string type and will hold the raw data from the Event Hub. If not sure about the schema during creation time, you can also adjust that afterwards in Azure portal or via api.
Keep the below reserved columns in mind and remember that KQL is case-sensitive when it comes to functions, tables, columns, operators, and keywords.
- id
- _ResourceId
- _SubscriptionId
- TenantId
- Type
- UniqueId
- Title
1
2
3
4
5
6
7
8
9
10
11
12
13
14
15
16
17
18
19
20
21
22
23
$tableParams = @'
{
    "properties": {
        "plan": "Auxiliary",
        "totalRetentionInDays": var_retention,
        "schema": {
            "name": "var_tableName",
            "columns": [
                {
                    "name": "TimeGenerated",
                    "type": "datetime",
                    "description": "The time at which the data was ingested."
                },
                {
                    "name": "RawData",
                    "type": "string",
                    "description": "Body of the event."
                }
            ]
        }
    }
}
'@
Auxiliary tables currently do not support dynamic properties in their schema, whereas Basic and Analytics tables do. If your use case requires dynamic properties, consider using a Basic or Analytics table instead, or alternatively parse the data at query time.
1
2
3
4
5
6
7
8
9
10
11
12
13
14
15
16
17
18
19
20
21
22
23
24
25
26
27
28
$tableParams = @'
{
    "properties": {
        "plan": "Basic|Analytics"",
        "totalRetentionInDays": var_retention,
        "schema": {
            "name": "var_tableName",
            "columns": [
                {
                    "name": "TimeGenerated",
                    "type": "datetime",
                    "description": "The time at which the data was ingested."
                },
                {
                    "name": "RawData",
                    "type": "string",
                    "description": "Body of the event."
                },
                {
                    "name": "Properties",
                    "type": "dynamic",
                    "description": "Additional message properties."
                }
            ]
        }
    }
}
'@
To scale the deployment across multiple data sources and their associated tables, we will use the snippet below. The script iterates through the data map to create the custom tables, following the same approach previously used for provisioning the Event Hubs.
To avoid dedicated parameters file we doing it inline within the script by replacing pre-defined varaibles with the actual values from the data map. This way we can easily create multiple custom tables without the need for a separate parameters file. The same approach will be used for the DCR and DCR association creation in the next steps.
1
2
3
4
5
6
7
8
foreach ($item in $dataMap) {

    $table = $tableParams -replace "var_tableName", $($item.source + "_CL")
    $table = $table -replace "var_retention", $item.totalRetentionInDays
    $table = $table -replace "var_plan", $item.plan

    Invoke-AzRestMethod -Path $($workspaceId + "/tables/" + $item.source + "_CL" + "?api-version=2023-01-01-preview") -Method PUT -payload $table
}
More information around auxiliary tables can be found here: https://learn.microsoft.com/en-us/azure/azure-monitor/logs/create-custom-table-auxiliary
Did you know that the Auxiliary tier now also supports transformations to further parse and optimize data before ingestion? To learn more about KQL transformations, see https://learn.microsoft.com/en-us/azure/azure-monitor/data-collection/data-collection-transformations
🛠️3 Create dedicated DCR per data source and Event Hub
To ensure we have a dedicated Data Collection Rule (DCR) for each data source and Event Hub, we will again iterate through the data map and create a DCR for each data source. Each DCR will be linked to the Data Collection Endpoint (DCE) and one of the custom tables created in the previous step.
Keep the Logs Ingestion API limits in mind when using Data Collection Rules as each DCR comes with a throughput limit of
2 GB per minute. If this limit is exceeded, the response will include aRetry-Afterheader - Helpfully, the Event Hub-based ingestion service features a built-in retry logic, which automatically attempts to resend the data to the workspace to further enhance reliability and ensuring smoother data flow. https://learn.microsoft.com/en-us/azure/azure-monitor/fundamentals/service-limits#logs-ingestion-api
Although it is technically feasible to consolidate multiple data sources into a single Event Hub and Data Collection Rule (DCR), we opt to assign a dedicated DCR to each source as mentioned above. This strategy improves clarity and separation, simplifies monitoring via metrics such as bytes sent/received per data source, streamlines data ingestion management, and enables horizontal scalability. Additionally, the template comes with diagnostic settings preconfigured for the DCRs. 😊
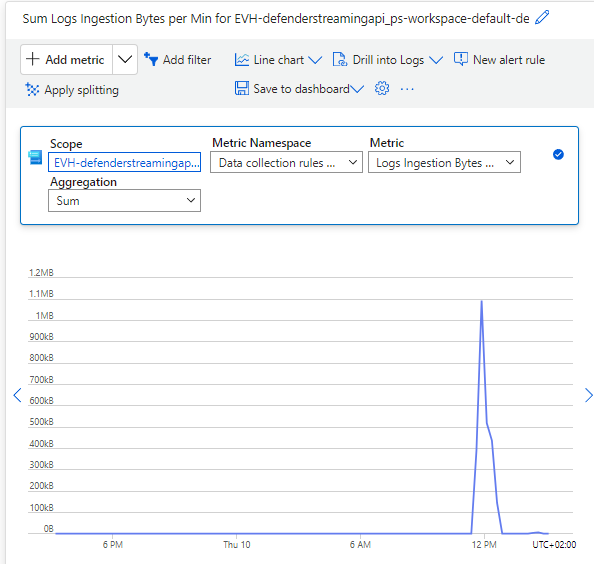
You can also check for metrics on Event Hub side as soon as start streaming your data.

The DCE needs to be created before going with the below script to create the DCR. If you going for AMPLS, then create the DCE in desired region and associate it with the proper AMPLS scope.
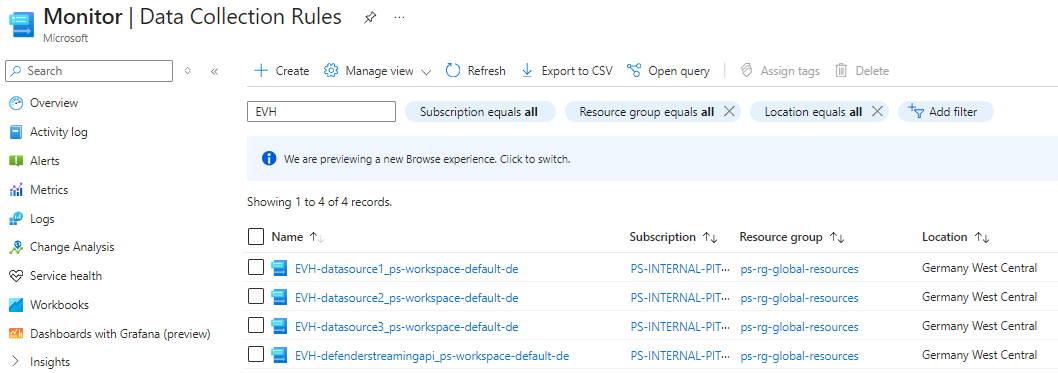
Now lets have a look to the code snippet to get this deployed. For this we again using the ARM template from https://learn.microsoft.com/en-us/azure/azure-monitor/logs/ingest-logs-event-hub#create-a-data-collection-rule and replacing the pre-defined variables inline with the actual values from our data map. The DCR is then created with EVH as name prefix, so you can easily identify it as Event Hub DCR.
1
2
3
4
5
6
7
8
9
10
11
12
13
foreach ($item in $dataMap) {

    $dcrName = ("EVH-" + $($item.source + "_" + $workspaceName).ToLower())

    $dcrTemplate = $dcrParams -replace "var_tableName", $($item.source + "_CL")
    $dcrTemplate = $dcrTemplate -replace "var_endpointResourceId", $dce_id
    $dcrTemplate = $dcrTemplate -replace "var_workspaceId", $workspaceId
    $dcrTemplate = $dcrTemplate -replace "var_location", $location
    $dcrTemplate = $dcrTemplate -replace "var_dataCollectionRuleName", $dcrName

    $TemplateHashTable = $dcrTemplate | ConvertFrom-Json -AsHashtable
    New-AzResourceGroupDeployment -ResourceGroupName $resourceGroup -TemplateObject $TemplateHashTable -DeploymentName $dcrName
}
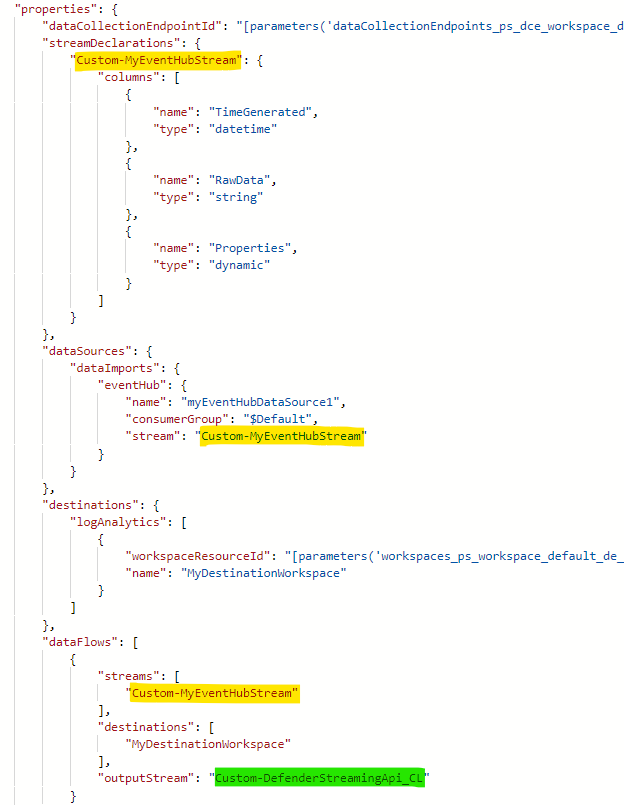
For the DCR the most important part the is
streamDeclarationwhich needs to be set to Custom-MyEventHubStream - this is the special part which allows the DCR to consume data from the Event Hub. Also make sure the DCR is linked to the DCE and the custom table is defined in theDataFlowsasoutputStream.
streamDeclarations: Defines which data to ingest from the event hub (incoming data). The stream declaration can’t be modified.TimeGenerated: The time at which the data was ingested from event hub to Azure Monitor Logs.RawData: Body of the eventProperties: User properties from the event.
In essence, the DCR acts as the consuming client by connecting to the Event Hub via the
AMQPprotocol to efficiently retrieve the data and forwarding it to the designated workspace: https://learn.microsoft.com/en-us/azure/event-hubs/event-hubs-features#read-events
🔗4 Associate the data collection rule with the event hub (DCRA)
Almost there! Now, we need to associate each DCR with the Event Hub. As before, we will loop through the data map and create a DCR association for each data source. This association will link the DCR with the Event Hub, enabling the DCR to consume/receive data from the Event Hub. For more details on how to create a DCR association, see the documentation at https://learn.microsoft.com/en-us/azure/azure-monitor/logs/ingest-logs-event-hub#associate-the-data-collection-rule-with-the-event-hub.
1
2
3
4
5
6
7
8
9
10
11
12
13
foreach ($item in $dataMap) {

    $dcrName = ("EVH-" + $($item.source + "_" + $workspaceName).ToLower())
    $dcrId = $($resourceGroupId + "/providers/Microsoft.Insights/dataCollectionRules/" + $dcrName)
    $dcrAssocName = ("EVH-dcr-assoc-" + $item.source + "_" + $workspaceName).ToLower()

    $associateTemplate = $dcrAssociateParams -replace "var_EventHubResourceID", $($eventHubNamespaceId + "/eventhubs/" + $item.source)
    $associateTemplate = $associateTemplate -replace "var_dataCollectionRuleID", $dcrId
    $associateTemplate = $associateTemplate -replace "var_associationName", $dcrAssocName

    $TemplateHashTable = $associateTemplate | ConvertFrom-Json -AsHashtable
    New-AzResourceGroupDeployment -ResourceGroupName $resourceGroup -TemplateObject $TemplateHashTable -DeploymentName $dcrAssocName
}
Note: The data collection association (DCRA) needs to be in same region as the Event Hub while the workspace and its DCE and DCR can be in a different region. If possible, place the Event Hub in same region as the workspace to avoid cross-region data transfer.
Make sure to consider the currently supported regions, given that this feature is in preview: https://learn.microsoft.com/en-us/azure/azure-monitor/logs/ingest-logs-event-hub#supported-regions
🔑5 Assign event hub receiver permission to DCR managed identity (role assignment)
While we technically have everything in place, the DCR cannot yet consume data from the Event Hub due to missing permissions. Thus, we need to assign the Azure Event Hubs Data Receiver role to the DCR’s managed identity for each Event Hub. The DCRs are acting as the consumer groups/clients for the Event Hubs.
1
2
3
4
5
6
7
8
9
10
11
12
foreach ($item in $dataMap) {

    $dcrName = ("EVH-" + $($item.source + "_" + $workspaceName).ToLower())
    $EventHubId = $($eventHubNamespaceId + "/eventhubs/" + $item.source)

    # Get the DCR managed identity
    $dcr = Get-AzResource -ResourceGroupName $resourceGroup -ResourceType "Microsoft.Insights/dataCollectionRules" -ResourceName $dcrName
    $principalId = $dcr.Identity.PrincipalId

    # Assign the Event Hub Data Receiver role to the DCR managed identity
    New-AzRoleAssignment -ObjectId $principalId -RoleDefinitionName "Azure Event Hubs Data Receiver" -Scope $EventHubId
}
Conclusion
By following these steps, you have successfully established a data ingestion pipeline from Event Hub to Sentinel using Azure Monitor’s Data Collection Endpoint and Data Collection Rule. This setup enables you to efficiently collect and process large volumes of data from various sources without the need for custom code or complex configurations.
In my opinion, this is a fantastic addition to the Azure Monitor toolkit, making it much easier to work with Event Hub and Sentinel. I hope you found this blog post helpful and informative. If you have any questions or feedback, feel free to reach out to me. 😊🤞