Detect suspicious DNS requests using Azure DNS Security Policy and Sentinel Summary Rules
Came you also across the situation or requirement to log DNS queries from within Azure VNET? If yes, then this blog may be of interest for you.
While this was not possible in the past without going with your own DNS forwarder to collect DNS queries, with DNS Security Policy Azure now provides a new public preview feature for this which allows you to filter (block) and log DNS queries at the VNet level, providing enhanced security and visibility into your network traffic.
This really is a game changer to easily provide visibility without complex configurations or third-party solutions. So let’s see how to get this configured and to use it in combination with Summary Rules in Microsoft Sentinel to then run detection rules on it by leveraging Threat Intel 🙃
Below the topics we will cover:
- What is Azure DNS Security Policy
- Auditing and Logging using Wildcards
- Sentinel Summary Rules
- Bringing DNS Security Policy and Sentinel Summary Rules together
- Create DNS Security Policy and Logging via Azure CLI
- Create the Sentinel Summary Rule
- Create Sentinel detection rule
- Additional rule to detect suspicious IPs from the DNS answer
- Finally test the detection rule
What you will achieve by the end of this guide
By following this step-by-step guide, you will implement a DNS monitoring and threat detection setup using Azure and Microsoft Sentinel.
- ✅ Azure DNS Security Policy with logging enabled for all DNS queries
- 📊 Sentinel Summary Rule to aggregate the DNS queries
- 🔍 Sentinel Analytics Rule to detect suspicious DNS queries based on threat intel:
- Suspicious DNS queries based on exact domain name
- Suspicious DNS queries based on parent domain
- Suspicious DNS queries based on CNAME answer
- Suspicious DNS queries based on IP address answer
What is Azure DNS Security Policy
As mentioned above, Azure DNS Security Policy (learn.microsoft.com) is a new public preview feature that allows you to filter and log DNS queries at the VNet level. This feature is designed to enhance network security by providing visibility into DNS traffic and enabling organizations to block known malicious domains.
Using this feature provides you the below capabilities:
DNS Query Filtering: Block known malicious domains to prevent DNS-based attacksDNS Logging: Capture detailed logs of DNS queries and send them to a Storage Account, Log Analytics Workspace, or Event Hubs via Azure diagnostic settings
A DNS security policy has the following associated elements and properties:
Location: The Azure region where the security policy is created and deployed.DNS traffic rules: Rules that allow, block, or alert based on priority and domain lists.Virtual network links: A link that associates the security policy to a VNet.DNS domain lists: Location-based lists of DNS domains.
The policy:VNet relationship is 1:N. When a VNet is associated with a security policy (via virtual network links), that VNet can’t be associated with another security policy without first removing the existing virtual network link. A single DNS security policy can be associated with multiple VNets in the same region.
Auditing and Logging using Wildcards
In this blog, we focus solely on the logging capability for running detection through Sentinel. Fortunately, DNS security policy permits the use of wildcards to log every DNS query. This is achieved by creating a domain list with the wildcard [.] and linking it to the DNS security policy.
To get this audited/logged, just make sure that you are using the built-in Azure Vnet DNS resolver somewhere in the dns query flow (168.63.129.16).
Sentinel Summary Rules
Microsoft Sentinel’s Summary Rules (learn.microsoft.com), currently also in public preview, allow you to aggregate large sets of data across log tiers, providing lightning-fast query performance and cost-effective data management.
👉 Why this is important for the DNS Security Policy logs?
Because we can expect to see large amounts of data coming in from the DNS queries when using wildcard domain list (verbose logging). This is where the summary rules come into play to provide an efficient way to manage and analyze this data and to easily run detections on it.
It also allows us to reduce some noise upfront, for instance not logging/aggregating DNS queries for some Azure services themselves or other expected queries you often see in your workload which are known to be non-suspicious.
When considering aggregation and detection timing for Summary Rules in Microsoft Sentinel, it’s crucial to define the aggregation interval carefully. A larger interval can lead to hugh cost savings and reduced data volume, but it may also result in delayed detection of security events. Conversely, a shorter interval enhances detection timing but may diminish the benefits of using Summary Rules due to increased data processing. In my lab I could reduce the data volume by 80-90% using a 1h aggregation interval.
To check for other summary rule scenarios have a look to sentinel summary rule scenarios (learn.microsoft.com)) and using summary rules to store data cost effectively (techcommunity.microsoft.com).
Bringing DNS Security Policy and Sentinel Summary Rules together
By leveraging the combined power of Azure DNS Security Policy and Sentinel Summary Rules, you can streamline your DNS security operations, making it easier to manage and analyze DNS logs while maintaining robust protection against cyber threats. See the following sections for a step-by-step guide on how to set up this integration.
Create DNS Security Policy and Logging via Azure CLI
Secure and view DNS traffic (learn.microsoft.com) describes information on how to configure it via Azure Portal or Azure PowerShell. In this blog we will do the same via Azure CLI 🫡
As usual, we first want to define our environment/variables and the resources we need to create. This is done in the below code snippet which does also create a dedicated resource group. The workspaceId is your Sentinel workspace, the vnet variable is the id of your Vnet you want to link to the DNS Security Policy.
Full script can be found in my GitHub repository
1
2
3
4
5
6
7
8
9
10
11
12
13
$ResourceGroup = "sampleDnsResourceGroup"
$location = "swedencentral"

$DnsDomainListName = "sampleDnsResolverDomainListWildcard"
$DnsResolverPolicy = "sampleDnsResolverPolicy"
$DnsSecurityRule = "sampleAuditAllRequests"

$diagnosticSettingName = "sampleDnsResolverPolicyDiagnosticSetting"
$workspaceId = "/subscriptions/xxxxxxxx/resourcegroups/xxxxxxxx/providers/microsoft.operationalinsights/workspaces/xxxxxxxx"

$vnet = "/subscriptions/xxxxxxxx/resourceGroups/xxxxxxxx/providers/Microsoft.Network/virtualNetworks/xxxxxxxx"

az group create --name $ResourceGroup --location $location
To get started, we need to create a DNS Resolver Policy which acts as container for the other elements. The --location parameter is important as the DNS Resolver Policy must be created in the same region as the VNet you want to link it to. The --query id parameter returns the id of the created DNS Resolver Policy which we need later to configure the diagnostics settings in order to send the logs to Sentinel.
1
$resolverPolicyId = $(az dns-resolver policy create --resource-group $ResourceGroup --dns-resolver-policy-name $DnsResolverPolicy --location $location --query id --output tsv)
Because we want to audit/log any dns query, we need to create a domain list with the wildcard "[.]" which is then attached to the DNS Resolver Policy. The --domains parameter is the wildcard domain list we want to create. The --query id parameter returns the id of the created domain list which we need for the next step.
1
2
$DnsDomainListId = $(az dns-resolver domain-list create --resource-group $ResourceGroup --dns-resolver-domain-list-name $DnsDomainListName --location $location --domains "[.]" --query id --output tsv)
$DnsDomainListName = $("[{id:" + $DnsDomainListId + "}]")
After having the domain list created, we can add a dns security policy rule to the DNS Resolver Policy and linking the domain list to it. The --action parameter can be set to Allow, Block, or Alert. In our case, we want to log all requests, so we go for Allow.
1
az dns-resolver policy dns-security-rule create --resource-group $ResourceGroup --policy-name $DnsResolverPolicy --dns-security-rule-name $DnsSecurityRule --location $location --priority 100 --action "{action-type:Allow}" --domain-lists $DnsDomainListName --rule-state Enabled
The last step for the inital setup is to link your vnets to the DNS Resolver Policy. The --location parameter is important as the DNS Resolver Policy must be created in the same region as the VNet you want to link it to. The --virtual-network parameter is the id of your Vnet you want to link to the DNS Resolver Policy.
1
2
$vnet = $("[{id:" + $vnet + "}]")
az dns-resolver policy vnet-link create --resource-group $ResourceGroup  --policy-name $DnsResolverPolicy --dns-resolver-policy-virtual-network-link-name "sampleVirtualNetworkLink1" --location $location --virtual-network $vnet
To now bring the events into our Sentinel workspace, we have to create the diagnostic setting for the DNS Resolver Policy. The --logs parameter is the list of logs we want to send to Sentinel. In our case, we want to send the DnsResponse logs. The --workspace parameter is the id of your Sentinel workspace.
1
2
3
# [{"category":"DnsResponse","enabled":true}]
# [{"categoryGroup":"allLogs","enabled":true}]
az monitor diagnostic-settings create --name $diagnosticSettingName --resource $resolverPolicyId --logs '[{"category":"DnsResponse","enabled":true}]' --workspace $workspaceId
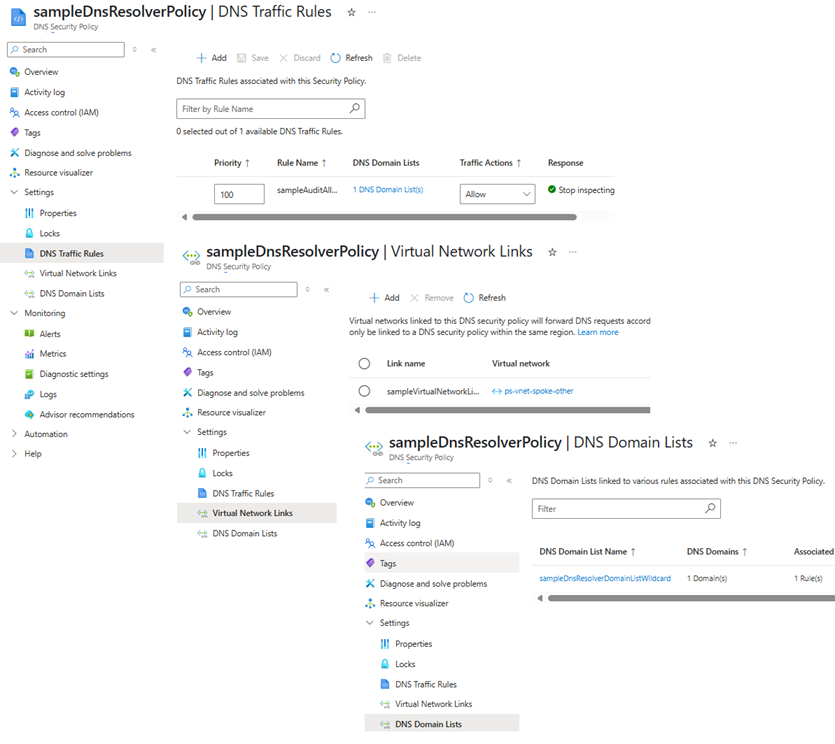
After running the above commands, you can check the deployed resources in the Azure portal.
Because we want to run our detection rule against the aggregated data instead against the built-in table, we can bring the DNSQuery table into basic tier to save costs.
As of the time of writing this blog (2025-04), auxiliary log tier is only supported for new custom tables but not for the built-in ones. Because DNSQuery table does not support ingestion-time transformation, we can also not forward the data to a custom table.
1
2
3
4
$resourceGroup = $workspaceId -match "/resourcegroups/([^/]+)/" | Out-Null; $resourceGroup = $matches[1]
$workspaceName = $workspaceId -match "/workspaces/([^/]+)$" | Out-Null; $workspaceName = $matches[1]

az monitor log-analytics workspace table update --resource-group $ResourceGroup --workspace-name $workspaceName --name "DNSQueryLogs" --plan Basic --retention-time -1
That’s it, you should now see the DNS queries coming in to your Sentinel workspace. It does not matter if doing some queries from a VM or Container running in k8s for example - as long as you have a Vnet you can link and the Azure Vnet DNS resolver is used in the query flow, you are all set 🥳
1
2
DNSQueryLogs
| take 10
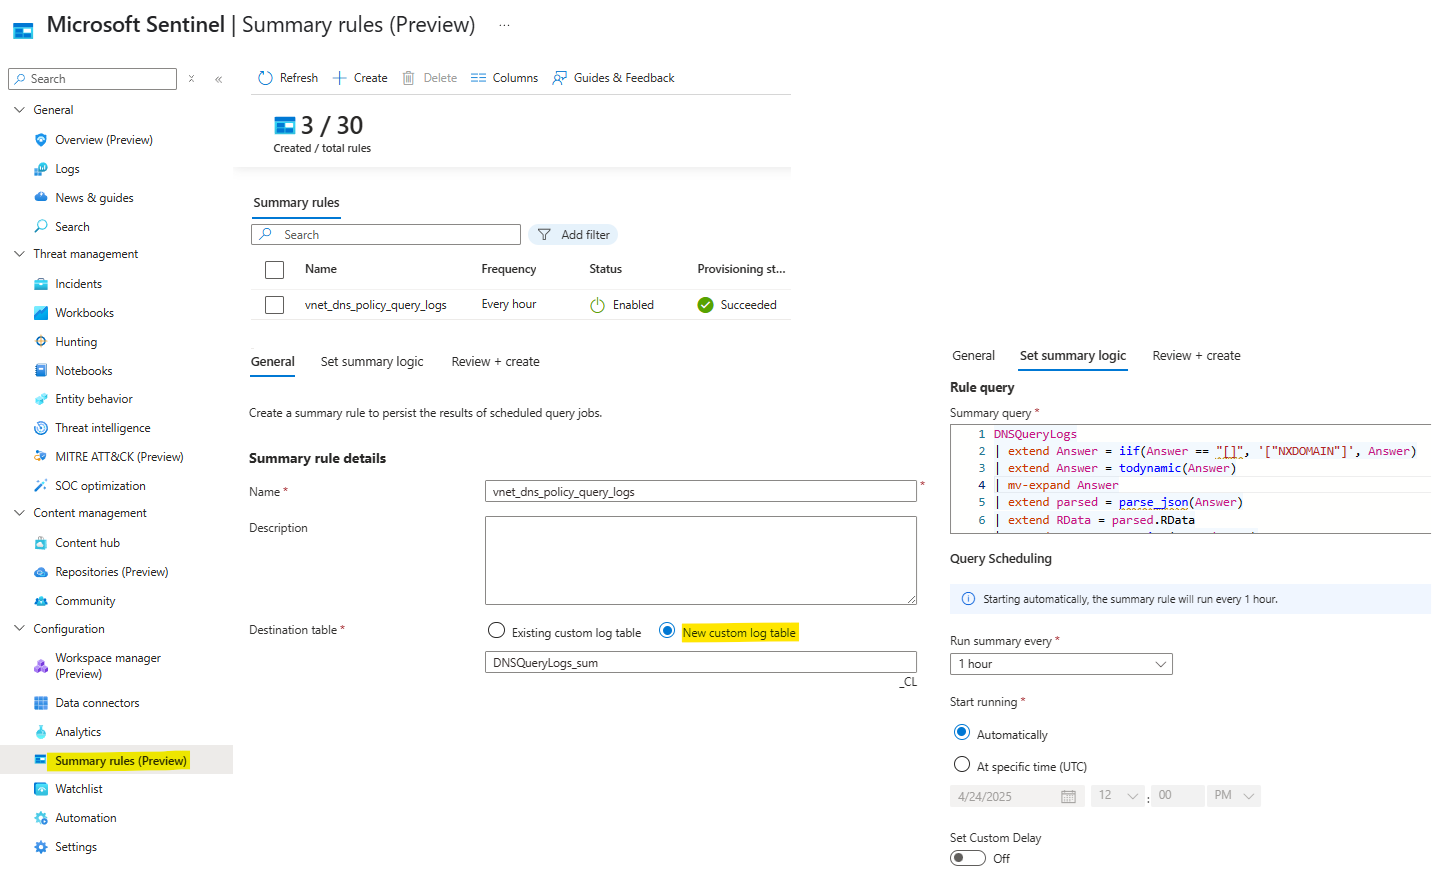
Create the Sentinel Summary Rule
Now we want to prepare the data source for the detection rule. For this we will use the Summary Rules in Sentinel to aggregate the data and to reduce the amount of data we need to process.
To configure Summary Rules in Microsoft Sentinel, start by opening Sentinel in either the Azure or Defender portal, navigate to Summary Rules and click on the option to create a new rule. Enter the name and description for your rule, enter the custom table where to send the data and finally, define the aggregation interval, such as 1 hour - to balance cost efficiency and detection timing - and then copy the below KQL query into the query box.
1
2
3
4
5
6
7
8
9
10
11
12
13
DNSQueryLogs
| extend Answer = iif(Answer == "[]", '["NXDOMAIN"]', Answer)
| extend Answer = todynamic(Answer)
| mv-expand Answer
| extend parsed = parse_json(Answer)
| extend RData = parsed.RData
| extend RType = tostring(parsed.Type)
// removing the trailing dot
| extend QueryName = tolower(trim_end("\\.", QueryName))
// finally aggregate
| summarize EventCount = count(), Answers = make_set(tostring(RData))
    by bin(TimeGenerated, 1h), RType, OperationName, Region, VirtualNetworkId, SourceIpAddress, Transport, QueryName, QueryType, ResponseCode, ResolutionPath, ResolverPolicyRuleAction
| extend RDataCount = array_length(Answers)
Latest KQL query can be found in my GitHub repository
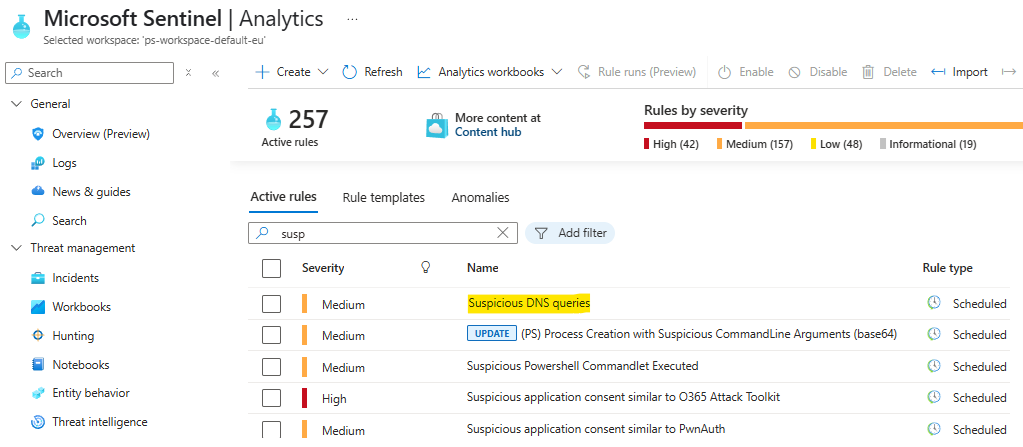
Create Sentinel detection rule
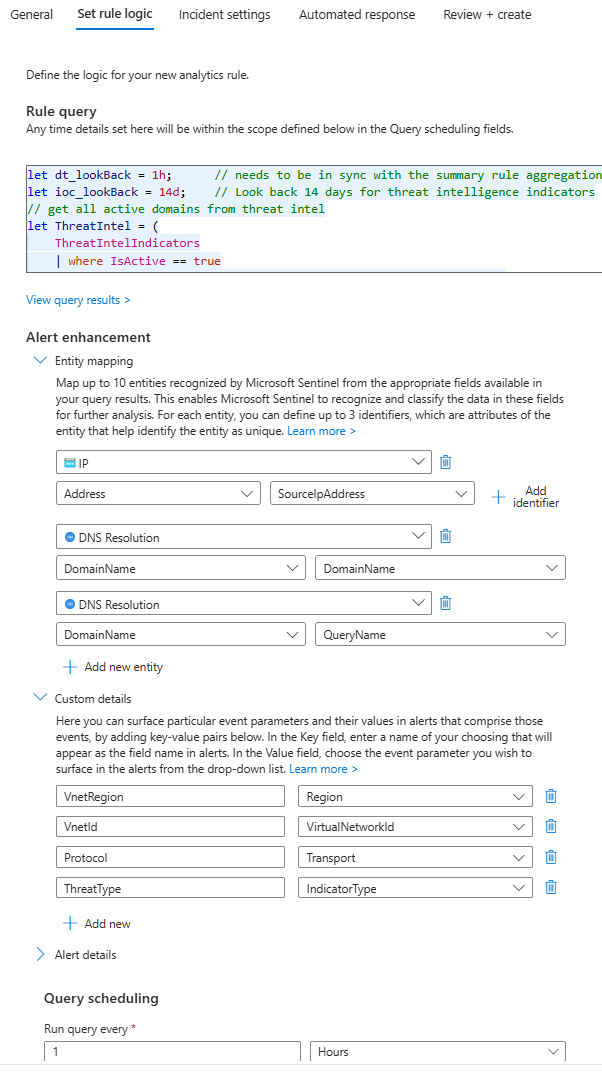
To create the detection/analytics rule in Sentinel, navigate to the “Analytics” section and select “Create” to start the setup. Choose the “Scheduled query rule” option and enter the name and description for your rule. Copy the below KQL query into the query box, then set the query frequency to match the aggregation interval of your summary rule, such as 1 hour, and the lookup period to 14d. The rule will then check for exact query matches, parent domain matches, and CNAME answer matches against the threat indicators table.
You may want to prepare the detection test already upfront by
resolvingsome suspcious domains from a test machine within the linked Vnet - this will ensure that you will see a match right after deploying the detection/analytics rule to Sentinel -> Finally test the detection rule
1
2
3
4
5
6
7
8
9
10
11
12
13
14
15
16
17
18
19
20
21
22
23
24
25
26
27
28
29
30
31
32
33
34
35
36
37
38
39
40
41
42
43
44
45
46
47
48
49
50
51
52
53
54
55
56
57
58
// detect suspicious DNS requests using dns security policy and threat intelligence
let dt_lookBack = 1h;      // needs to be in sync with the summary rule aggregation interval
let ioc_lookBack = 14d;    // Look back 14 days for threat intelligence indicators
// get all active domains from threat intel
let ThreatIntel = materialize(
    ThreatIntelIndicators
    | where TimeGenerated >= ago(ioc_lookBack) and ValidUntil > now()
    | where IsActive == true
    | summarize LatestIndicatorTime = arg_max(TimeGenerated, *) by Id
    | extend source = Data.name
    | extend IndicatorType = tostring(Data.indicator_types)
    | where ObservableKey has "domain"
    | extend DomainName = ObservableValue
    | where isnotempty(DomainName)
);
let DNSQueryLogs_sum = (
    DNSQueryLogs_sum_CL
    | where TimeGenerated >= ago(dt_lookBack)
    // remove trailing dot from domain
    | extend QueryName = trim_end("\\.", QueryName)
);
//----------------------
// dns query match
let ioc_query_match_parentdomain_only = (
    ThreatIntel
    | project DomainName, IsActive, Confidence, ValidUntil, IndicatorType
    | join kind=inner (
        DNSQueryLogs_sum
        // extract contoso.com from sub.contoso.com
        | extend DomainNameExtractKey = replace_regex(QueryName, "^.*?\\.", "")
        | extend _LookupType = "query_match_parentdomain_only"
    ) on $left.DomainName == $right.DomainNameExtractKey
);
// dns query match
let ioc_query_match_exact = (
    ThreatIntel
    | project DomainName, IsActive, Confidence, ValidUntil, IndicatorType
    | join kind=inner (
        DNSQueryLogs_sum
        | extend _LookupType = "query_match_exact"
    ) on $left.DomainName == $right.QueryName
);
// dns answer match for cname
let ioc_answer_match_exact = (
    ThreatIntel
    | project DomainName, IsActive, Confidence, ValidUntil, IndicatorType
    | join kind=inner (
        DNSQueryLogs_sum
        | where RType == "CNAME"
        | mv-expand AnswersKey = Answers to typeof(string)
        // remove trailing dot from expanded answers
        | extend AnswersKey = trim_end("\\.", AnswersKey)
        | extend _LookupType = "answer_match_exact"
    ) on $left.DomainName == $right.AnswersKey
);
ioc_query_match_parentdomain_only
| union ioc_query_match_exact, ioc_answer_match_exact
| project TimeGenerated, QueryName, DomainName, IsActive, Confidence, ValidUntil, IndicatorType, RType, OperationName, SourceIpAddress, Transport, Answers, RDataCount, EventCount, Region, VirtualNetworkId, _LookupType
Latest KQL query can be found in my GitHub repository
The above query makes already use of the new STIX 2.1 based Threat Intellignent tables in Sentinel. For more information see Whats new in Sentinel (learn.microsoft.com). Also make sure you have the proper Threat Intelligence data connector (learn.microsoft.com) enabled for your Sentinel workspace.
After creating the rule, you can further adjust as needed such as severity, rule logic or alert grouping.
Finally test the detection rule
To test the detection, simply try to resolve a domain which is in the threat intel list using nslookup, ping, or other tools. To find out which domains are in the list, you can use the below kusto query:
1
2
3
4
5
6
7
8
9
ThreatIntelIndicators
| where TimeGenerated >= ago(ioc_lookBack) and ValidUntil > now()
| where IsActive == true
| summarize LatestIndicatorTime = arg_max(TimeGenerated, *) by Id
| extend source = Data.name
| extend IndicatorType = tostring(Data.indicator_types)
| extend DomainName = ObservableValue
| where ObservableKey has "domain"
| project DomainName
Additional rule to detect suspicious IPs from the DNS answer
You may also want to detect suspicious DNS requests based on the IP address answer. This can be done by joing the IP from the dns answer with suspicious IPs from the Threat Intel table.
1
2
3
4
5
6
7
8
9
10
11
12
13
14
15
16
17
18
19
let dt_lookBack = 1h;
let ioc_lookBack = 14d;
ThreatIntelIndicators
| where TimeGenerated >= ago(ioc_lookBack) and ValidUntil > now()
| where IsActive == true
| summarize LatestIndicatorTime = arg_max(TimeGenerated, *) by Id
| extend IndicatorType = tostring(Data.indicator_types)
| where ObservableKey has "network-traffic"
| extend IpAddr = ObservableValue
| where isnotempty(IpAddr)
| project IpAddr, IsActive, Confidence, ValidUntil, IndicatorType
//-----------
| join kind=inner (
    DNSQueryLogs_sum_CL
    | where TimeGenerated >= ago(dt_lookBack)
    | where RType in ("A","AAAA")
    | mv-expand Answers to typeof(string)
    | distinct QueryName, RType, Answers
) on $left.IpAddr == $right.Answers
When not going for the dns query summary rule, you could also join directly with the DNSQueryLogs table.
Just make sure, the DNSQueryLogs table is still in
analyticsand not inbasictier to be elgible to do thejoinand to eventually run this as detection rule.
1
2
3
4
5
6
7
8
9
10
11
12
13
14
15
16
17
18
19
20
21
22
23
24
25
let dt_lookBack = 1h;
let ioc_lookBack = 14d;
ThreatIntelIndicators
| where IsActive == true
| summarize LatestIndicatorTime = arg_max(TimeGenerated, *) by Id
| extend IndicatorType = tostring(Data.indicator_types)
| where ObservableKey has "network-traffic"
| extend IpAddr = ObservableValue
| where isnotempty(IpAddr)
| project IpAddr, IsActive, Confidence, ValidUntil, IndicatorType
//-----------
| join kind=inner (
    DNSQueryLogs
    | where TimeGenerated >= ago(dt_lookBack)
    | extend Answer = iif(Answer == "[]", '["NXDOMAIN"]', Answer)
    | extend Answer = todynamic(Answer)
    | mv-expand Answer
    | extend parsed = parse_json(Answer)
    | extend RData = parsed.RData
    | extend RType = tostring(parsed.Type)
    // removing the trailing dot
    | extend QueryName = tolower(trim_end("\\.", QueryName))
    | where RType in ("A","AAAA")
    | distinct Answers = tostring(RData), QueryName, RType
) on $left.IpAddr == $right.Answers
Next Steps
Based on the detections we could further create playbooks in Sentinel/Defender. These could then add block rules to the DNS Security Policy for the domains which were detected, either on demand as incident action, or automatically - similar to existing playbooks around Azure Firewall/WAF as described at Automated Detection and Response for Azure WAF with Sentinel (techcommunity).
Also have a look to the blog of my colleague cloudtrooper who recently published about Azure Vnet Flow logs which is the successor of NSG flow logs. This is another great way to get visibility into your network traffic and to run detections on it. See Azure VNet Flow Logs (learn.microsoft.com) and vnet flow logs recipes (blog.cloudtrooper.net) for more information.